[section] [row] [col span__sm=”12″ align=”center” depth=”1″]This is a guide for your first roast using the Roast World/RoasTime Ecosystem. It assumes you’ve already read the manual and have some basic understanding of Roast Profiles. If you’re looking for more detailed information about roasting on the Bullet R1, please head to www.aillio.com/getting-started and peruse the articles available there.
Table of Contents
Pre-Roast Checklist
Preheating
[/col] [/row] [scroll_to title=”Pre-Roast Checklist” link=”areyouready”]
Are You Ready?
Pre-Roast Checklist:
1. Read the manual
2. Set up RoasTime and Roast.World
3. Find or create your first bean on Roast.World
If you haven’t done all three, here are the links you need to follow first: Bullet R1 User Manual , Getting Ready to Use RoasTime and Roast World. For everyone else, we will be following the example recipe from the manual.
V2 Roast Recipe Example: 350g
The following roast should finish in about 10 minutes or less.
Roast Level: Light
Weight: 350 grams
Preheat: 220ºC
Charge Settings: Power 7, Fan 2, Drum 9
Infrared Bean Temp@120ºC: Power 6, Fan 3
Infrared Bean Temp@165ºC: Power 5
Infrared Bean Temp@190ºC: Power 4
Infrared Bean Temp@200ºC: Fan 4
<First Crack Begins@196–204ºC >
45–90 seconds after First Crack: End the Roast
If you are looking for additional information about how to roast using other strategies and batch sizes, you can consult How to Roast Great Coffee on the Bullet R1. It should get you relatively close to where you want to go.
Now on to the good stuff.
[scroll_to title=”Preheating” link=”preheating”]
Preheating the Bullet
Set a Preheat temperature on the Control Panel of your Bullet R1, and either press the PRS button on the Control Panel or press the “Start Preheating” button on RT3. For our recipe, we will be preheating to 220ºC.

As shown in the image below, you can monitor the Total Time (of the Preheat), the Bean Temp (taken from the traditional bean temperature probe), the RoR (Rate of Rise, again taken from the traditional bean temperature probe), and the IR Drum Temp.
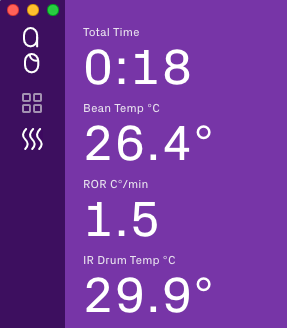
“IR Drum Temp” During Preheat
The Bullet R1 uses and IR (infrared) sensor to produce consistent preheat temperatures.
“Bean Temp” During Preheat
As the drum heats, the air inside of the roaster will also heat up, causing the temperature of the bean probe to rise. The Bullet R1 uses this reading to help determine when the Bullet’s temperature has stabilized at the correct preheat temperature.
“ROR” and “Total Time” During Preheat
The RoR (Rate of Rise) value is given in degrees Celsius (or Fahrenheit), per minute. It’s an indication of how quickly the bean probe is heating up (or cooling down).
Charging the Bullet R1

To “charge” the roaster means to put the beans in it. There are two ways for the Bullet to enter Charge mode: automatically and manually. The Bullet will automatically enter charge mode once the target preheat temperature is met and the Bean Temp RoR stabilizes, or after the roaster has been preheating for a minimum of 25 minutes.
Alternately, you can manually enter Charge mode by pressing the PRS button on the Control Panel, or by pushing the “Charge” button in RoasTime 3.
In both cases, as shown above, RoasTime 3 will inform you that the Bullet is ready to charge. Once you have entered charge mode and then drop the beans in, the Bullet R1 will automatically detect them and enter Roast Mode.
Roast Mode
The Roast Mode screen provides real-time data about the progress of your roast. There is a lot of data here, but for the purpose of this simple guide, we will just follow the recipe and focus on the IBTS Temp and the Power, Drum, and Fan settings.
According to the Roast Recipe, our initial settings are P7, D9, and F2. When the IBTS reaches 120ºC, we should change our settings to P6 and F3, as shown below. Notice how when we change these settings, the changes are shown below the graph on the Action Log.

As the roast progresses, we will make the appropriate changes each time the IBTS reaches a specified temperature, in this case at 165ºC, 195ºC, and 200ºC, and each change will be logged.
The Milestone Bar below the Profile allows us to mark Yellowing Point, First Crack, the End of First Crack, Second Crack, and the End of Second Crack by clicking on the buttons as the events occur, but you only need to mark those you feel are important. In our roast, we will simply mark First Crack, which should occur around 200ºC on the IBTS.
After First Crack, we can decide just how light we want this light roast to be. The recipe recommends between 45 seconds to 90 seconds, but of course this is up to you. (We decided to stretch the roast to 10 minutes, giving about 1:30 of development time, or time after First Crack.)
When we are ready to end the roast, we must first hit the PRS button on the Control Panel to tell RoasTime that the roast is now over before opening the door to drop the beans into the cooling tray. While we are stirring the beans in the Cooling Tray, RoasTime will display the Post Roast screen.
[scroll_to title=”Post Roast” link=”postroast”]After Your Roast
After you complete your roast, you will be presented with two options: You can cycle to Preheat Mode if you are back-to-back roasting, or you can view your last roast and edit its details. Let’s go to the last roast.

Once you’ve had a chance to look over the details of your last roast, it’s time to give it a name and associate it with the bean you created earlier on Roast.World. To do so you must click first click the (Edit) button in the upper right corner of the profile view, as shown below.
To select the bean, begin typing its name and select from the drop-down menu. If you’d also like to edit the Milestone Timeline or include other data for your roast, this is your chance!

Viewing the Roast on Roast.World
Now that the roast is complete, it will be automatically synced with the Roast.World server for your viewing pleasure. To find it, simply login and click the <My Roasts> button on the left.
Congratulations!
You’ve successfully roasted coffee using RoasTime and Roast World. 🙂
In the near future, we will be producing a more detailed guide to using RoasTime, including more advanced functions such as Recipe Mode.
[/section]


