(Very) Small Batch Roasting on the Bullet R1 w/ Rob Hoos
Using the Bullet R1 as a Sample Roaster
Why Do People Roast Very Small Batches?
Rob’s Approach to Roasting Small Batches
The “Proof in the Pudding” + Sample Profile
Introduction and Inspiration
As more and more coffee people become aware of the Bullet R1, more and more are asking whether it can be used as a sample roaster.
If the title of this article is any indication, then the short answer must be a resounding, full-throated “YES!”
As for the long answer, we’ve invited roasting guru Rob Hoos to lend a hand answering your questions. Rob is perhaps best known for his book about coffee roasting, “Modulating the Flavor Profile of Coffee: One Roaster’s Manifesto”, in which he explores the relationship between roasting techniques and flavor in the cup, in a way that is both grounded in the current science and also easily accessible for… well, the “less science-y” among us.
We’ve asked him to first share his personal approach to small batch roasting, and then to answer the Bullet R1 community’s many questions. It’s our collective hope that we will be able to de-mystify the sample/small-batch roasting process for you, while also shedding some light on common myths and assumptions that may be holding you (and your coffee) back.
But first, for those of you less familiar with very small batch roasting, let’s ask a very important question: “Why would anyone want to roast such small batches?”
A 1982 “Mecamau” — the dedicated sample roasting machine Rob is currently restoring.
Why do people roast very small batches anyway?
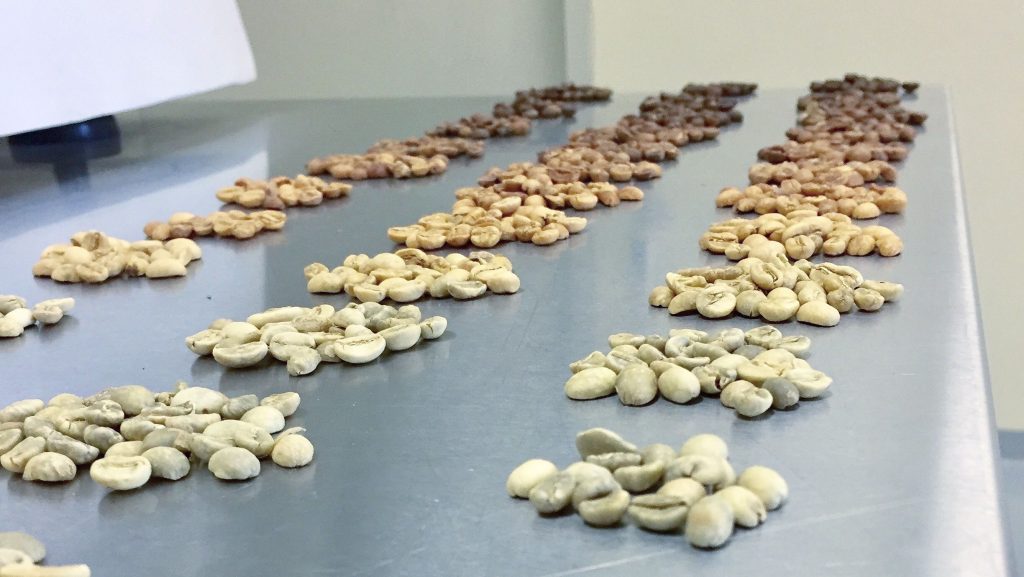
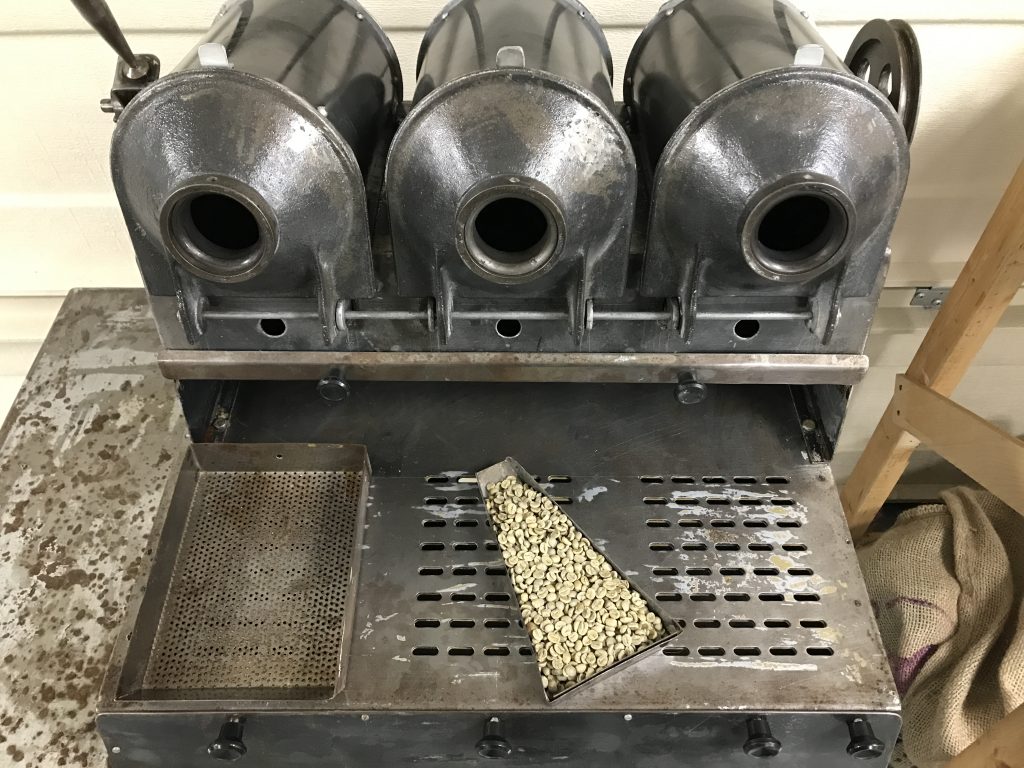
A great deal of small-batch roasting is for the purpose of “sample roasting” — a quick way to determine the quality of a given coffee before you make a larger green purchase. Sample roast batches range from 50g to about 250g, and some roasting machines — such as the Mecamau pictured above, are used exclusively for sample roasting.
Another reason why you may wish to roast very small batches is for “roast profiling,” which involves a series of roasts with the same bean. The end goal here is to determine how to best approach roasting the bean to produce the flavor you desire. (It’s important to note that roast profiling does not necessarily mean you will end up with the final bean curve, rather you are exploring how timings, weight loss, and end color impact the flavor of the coffee.)
As you’ll soon see below, the lines between “roast profiling” and “sample roasting” are a bit blurry these days, depending on the roaster’s purpose, but first let’s explore Rob’s general approach to sample roasting in particular, in his own words.
Rob’s Approach to Sample Roasting
(…in his words)
Hi everyone and thanks for having me!
I’ve been sample roasting for a long time, and I guess I will start by just briefly introducing what sample roasting is to me and why it is meaningful. I know many of you are home users, and as such you may or may not have the opportunity to use it as I do for making purchasing decisions, however, when you can it is important to try before you buy.
What is sample roasting?
Sample roasting’s goal is to roast a coffee lightly, and (within the framework of the history of specialty coffee) quickly, so as to assess the possible defects, cup quality, and flavor characteristics of a coffee. If a coffee is roasted too darkly, or for too long, there is a chance that certain flavor faults will be covered up and go undetected by the person buying the coffee. (Hint: if you want to use a defective coffee and try to cover it up, maybe try roasting it dark and long. *Shrug*)
In other words, we want to sample what we’re buying before we buy it… simple enough.
How do you sample roast a coffee? Well, sample roasting has classically been poorly defined. The SCAA definition says:
The sample should be roasted within 24 hours of cupping and allowed to rest for at least 8 hours.
The roast level for cupping shall be measured between 30 minutes and 4 hours after roasting using coffee ground to the SCA Standard Grind for Cupping and be measured on coffee at room temperature. The coffee shall meet the following measurements with a tolerance of ± 1.0 units:
- Agtron “Gourmet”: 63.0
- Agtron “Commercial”: 48.0
- Colortrack: 62.0
- Probat Colorette 3b: 96.0
- Javalytics: same as Agtron measurement using either “Gourmet” or “Commercial” scales
- Lightells: same as Agtron measurements using “Gourmet” scale
- RoastRite: same as Agtron measurements using “Gourmet” scale
The roast should be completed in no less than 8 minutes and no more than 12 minutes. Scorching or tipping should not be apparent.
Sample should be immediately air-cooled (no water quenching).
When they reach room temperature (app. 75º F or 20º C), completed samples should then be stored in airtight containers or non-permeable bags until cupping to minimize exposure to air and prevent contamination.
Samples should be stored in a cool dark place, but not refrigerated or frozen.
Reference above quoted from: https://sca.coffee/research/protocols-best-practices/
The downsides to this approach are many. For starters, it’s antiquated… this protocol had been around a while when I started teaching for the SCAA in 2013 and it still lives, unaltered today, almost 10 years later. Secondly, while it is trying to standardize the approach to sample roasting in the industry it does not really standardize anything but end color (those Agtron, etc… numbers above) on a relatively coarse grind.
This simply isn’t enough. We know that the difference between an 8 minute and 12 minute roast is huge. And it also doesn’t specify development time!!! Or anything else really. So yes, it’s better than nothing, but really it’s not so helpful for standardization. I could go on, but that’s not why we’re all here.
SCA guidelines aside… This is what to aim for in your sample roasts…
I would recommend roasting relatively quickly — 8-10 minutes — with a WB (whole-bean) color code of 65-70 Agtron and a development time of 1:00 minimum, but ideally more like 1:30. If you’ve hit 2:00 that’s awesome for production roasting, but you might be a little over-developed for a sample roast.
I would also suggest that, unless the moisture content of your coffee is quite low for starters, you should only see 11-13% weight loss. More than 13% weight loss means that (unless the coffee was pretty wet) you’ve likely over-roasted the coffee. And at anything less than 11% weight loss, I would be more concerned that you’ve under-roasted the coffee. (Yes, there can be great coffees at sub 11% weight loss… we’re just throwing out some guidelines.)
As to how to effectively do this on the Aillio Bullet R1 V2, first there are a few items I want to bring up about sample roasting in general.
- You’re usually not just sample roasting a single coffee at a time. Most of the time, people are evaluating their options to buy for a particular slot in their coffee lineup. This means that they may be looking at 5-10 different coffees of the same country, processing method, etc at a time. So you don’t want to have a long between batch protocol, you want to get it done and move on to other things. For this reason, when setting up the charge temperature for my sample roasting recommendations I didn’t want it to be too cool or too hot… otherwise it may take the Bullet a while to reach it and tell me to “charge.”
- It doesn’t matter how “data-driven” you are as a coffee roaster. You need to learn how to look at, smell, and listen to the coffee. Until you learn how to look at the coffee and understand where it is at and know what to do from there you are just playing a really expensive game of etch-a-sketch. Use your thermocouple, IBTS, and data 100%; but look at the coffee!
- Make a plan and try to follow it and then learn from every roast you do. When sample roasting things can happen quickly, so you don’t want to have to be changing too many parameters. I can guarantee you that a coffee didn’t taste better than the others because you were adjusting every knob available to you. It tasted great because you found the right end-temperature/end-color/weight-loss and timing for that coffee, and there are other ways of getting there that don’t complicate your job as a roaster.
With all that being said, how should we go about it on the Bullet?
My approach to sample roasting on the Bullet R1
First of all, I would like to recommend you start by charging to 200C.
“Why 200C?”
Well, thanks for asking! It is because by the time you are done cooling the 150 g sample in the cooling tray, the temperature of the IBTS is right around 200C. This enables you to quickly cycle and get the next batch in ASAP.
“Wait, 150 g? This is the first time you’re mentioning 150 g, why that batch size?”
The reason for 150 and not 200 or some other number is that in my experience you can usually count on getting 150 g sample size to try out the coffee. I had a bunch of Colombian coffees that came in when I started this project (I was originally planning to do 200 g) and they were all 150s and I thought… that’s a good point. If you are getting < 150 g sample sizes then I would recommend you ask the importer ahead of time for larger sample sizes. If they decline, offer to pay for the larger sample size. If they still decline, then you have to make the decision of whether or not you’re willing to buy a coffee of larger quantity without getting a decent sample size.
A 150g sample will usually yield around 130 grams. This would theoretically give you the chance to do 2 formal cuppings of the coffee before purchasing, or one formal cupping and 2 manual brews or 1 liter in an auto drip.
Okay, so we have a charge weight of 150 g, and a charge temperature of 200C. Next, how will we choose to control the Aillio Bullet R1 V2? I’ve tried a few different approaches…
As shown above, the airflow within the Bullet is a mix of cool and heated air.
Limiting variables…
One of the things I tried successfully over a year ago was controlling roasting in the Bullet using only airflow. I was patterning my roasting approach after the Probat BRZ’s and how I typically roasted on them. The BRZ, for those unfamiliar, is the open drum sample roaster that is ubiquitous in so many sample roasting situations. I’ve roasted on them in labs in the USA, and at producer residences. They have airflow split between their cooling trays and the drum, and like the Bullet R1, they bring cool air into the drum, so more airflow increases the amount of room temperature air moving into the system. They also have burner adjustments (essentially a stove or gas grill dial – most of the time without a gas gauge or anything).
Often when roasting you have to visually assess the flame size between the two drums to make sure they are roughly the same, and then you leave the flame alone and only adjust the airflow. Seems primitive, but it is how coffee gets roasted for samples most of the time.
Anyway, I tried doing this on the Bullet and just left it at D9 and P9 the whole roast and was rather successful for larger batches. I tried this for sample roasting using D9 and P6 (P6 because it was a smaller batch) and was not so successful. It yielded a great deal of uniformity issues in the coffee despite the profile curve looking completely wonderful.
So, I took a different approach. I decided that the airflow and the drum speed would be my two constants and that I would fluctuate the power setting as needed. This led me to keeping D9 F2 for the whole roast. F2 is fast enough to bring out the smoke and chaff, yet low enough that I am not just exhausting the heat out of the chamber.
I start with a power setting of P5, then back down to P4 around 4 minutes, and then P3 after first crack for the last minute or so. I am aiming for first crack at 8:00 and a development time of roughly 1:30 to an end temperature of around 200C on IBTS.
I’ll say that this comes with slight caveats. There is some degree of experience-based intuition that informs my power adjustments, and sometimes I need to change things on the fly. This is (to an extent) the nature of working with an agricultural product that can be extremely different from one sample to the next.
Things that can cause differences are: moisture content, density, water activity, screen size, cultivar/variety, processing method, country of origin, age, etc. So definitely understand these suggestions will only get you to a certain point, and you may have to adapt in the moment to a certain extent.
Sample Roasting vs Roast Profiling
Before we dive into some questions you all were asking, I just wanted to take a quick moment to dive into the differences and similarities of profile roasting and sample roasting.
On the surface, the definitions are pretty straightforward. Sample roasting is a loosely defined set of parameters that helps you evaluate a coffee for purchase. It is all about faster roasting to a light roast color. It doesn’t matter what the coffee is, you take the one-size-fits-all approach and apply it to the coffee and then cup it.
Profile roasting is, on the other hand, about manipulating time, temperature, and roast color to come up with the best fit for what you are trying to achieve with a coffee. So it is all about taking a coffee and making it the best it can be for your roasting approach. Sample roasting takes the expedient route, profile roasting takes the creative route.
This should bring up some questions that merit discussion though, because as we all know, the roast profile changes the sensory attributes of a coffee fairly significantly! It is possible that with one sample roasting profile “coffee A” may be preferred over “coffee B” however with a different sample roasting profile, “coffee B” may be preferred over “coffee A.” Please note when we are talking about this, we are not discussing finding defects, but more about determining cup characteristics and making purchasing decisions based on flavors. However, all sample roasting is also profile roasting (since all roasting is impacted by roast profile). The big difference is whether or not we choose to pay attention to the profile that we used. Classically, sample roasting has encouraged us to aim for these broad metrics and not take notes on the timing of yellowing, first crack, development time, etc.
So, with that in mind, I would make the suggestion that when sample roasting, it may be okay to not roast perfectly the same every time, however you need to keep track of your metrics and when you cup, later compare your cupping notes to the roast profile to keep from unfairly judging a coffee. If you cup a sample roast and it tastes veggie or grassy it could be a problem with the greens. Maybe they are old? Maybe the coffee just doesn’t have a flavor profile you enjoy? Or, maybe you look at the roast and see you only gave the coffee 50 seconds of development time? If you took the same coffee and gave it 90 seconds of development time it may cup out to be your favorite coffee. Always remember that coffees do not exist in a vacuum but have influences on them from every step of the process… and that final step of roasting is the only portal through which we view the flavor of the coffee. So take your notes and be diligent.
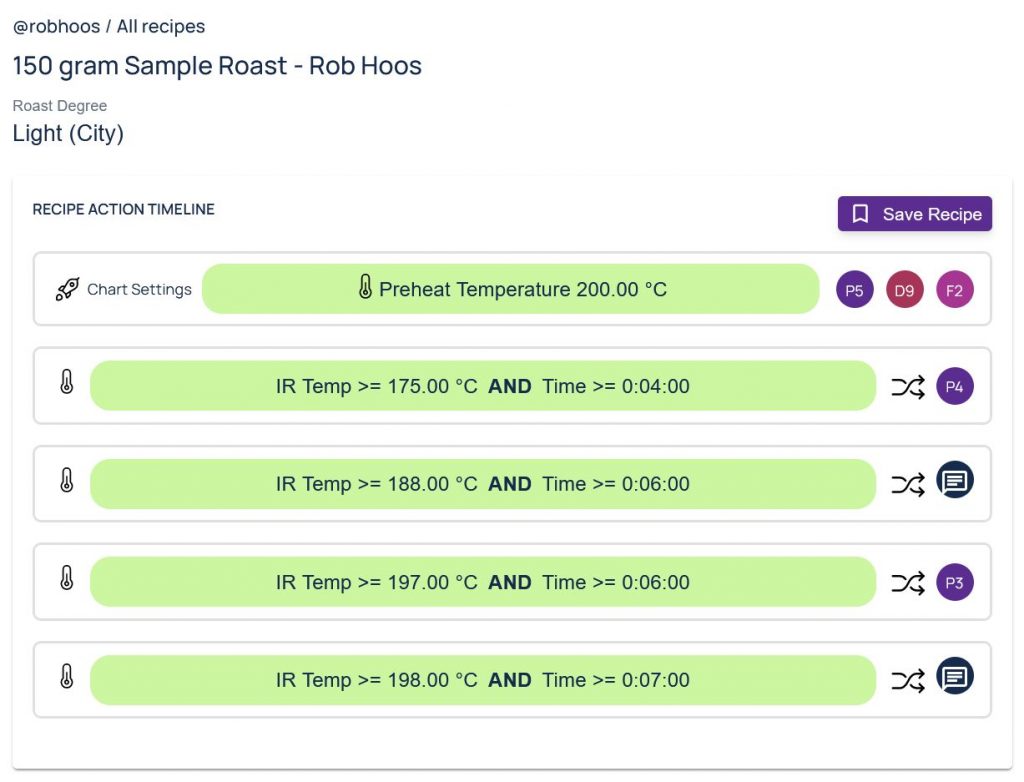
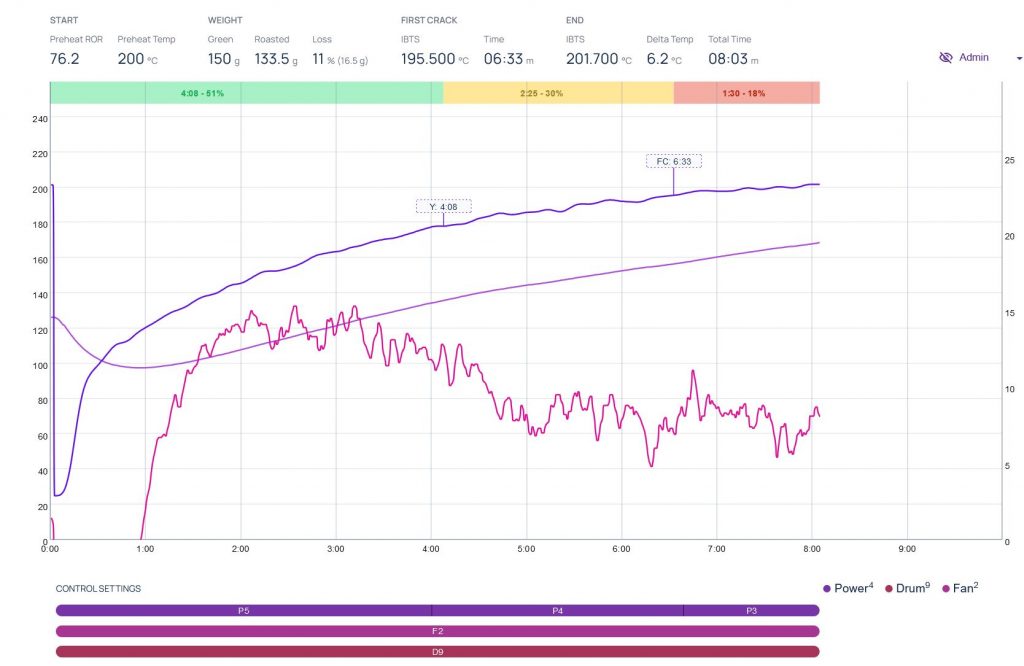
My 150g Roast Recipe
Below is a basic Roast Recipe that I designed for sample roasts of 150g on the Bullet R1 according to the guidelines above. You can download it from Roast.World here. Simply click on “Save Recipe” while logged into Roast.World to be able to run it yourself in RoasTime.
Questions from Bullet Owners
(All of these questions come from Bullet users — we received many. Some were already answered by Rob above, and for the sake of easy reading, some of the rest of them have been combined together. Thanks to everyone who sent us a question!)
IBTS and Bean Probe Questions:
- What’s the best way to manage airflow when sample roasting on the Bullet?
- As I mentioned above, I think it is best not to mess around with it assuming you can help it. Leaving the fan alone will limit variables and help you be consistent. With larger batches I think there is a value in using the fan more proactively, but with smaller batches I think having a less-is-more approach is really helpful.
- Is it possible to sample roast less than 300g and still rely on the IBTS sensor?
- Yes…ish…maybe. I drive the folks at Aillio crazy because I am still cautious about how I answer this one. It also depends on what you mean “rely” on the IBTS sensor. Will it read exactly the same as it does with larger batches? Likely not perfectly. Is it consistent in its batch size and can you use it consistently when sample roasting? I do.
- Due to the smaller batch size, how accurate are the IBTS and BT that we can rely on?
- I do believe that the IBTS is going to be more accurate than the NTC bean temperature probe. I think I pay more attention to it when roasting than I do the bean probe. I would also suggest that both are giving you valuable data. Even if the NTC is off and the IBTS is on when roasting, the question of why should be asked. If you had a solid between batch protocol and were adaptively roasting should they not both be on the money… I don’t know.
- IBTS versus bean probe: In my experience the temperature difference between the IBTS and bean probe is largest with small batches and it decreases as the the batch size increases. Does Rob use the IBTS, bean probe, or both for small batches?
- I always try to look to both to be honest. While I will usually rely on the IBTS more than the NTC I think both are giving useful information, one is just more “true” than the other.
- Do you use IBTS temp/ROR OR BT temp/ROR data?
- Yes 🙂
Roast Profile Questions:
- Hey it would be really helpful if Rob or SW could post a couple of profiles for different beans such as Ethiopians so one has a working sample profile to work off of.
- What appropriate power/fan adjustments, in regards to washed, natural, honey or other process method beans? For light/medium roastings.
- Sample recipe templates for Ethiopian, Guatemala, Colombian, Kenyan, washed and naturals?
- The point of sample roasting is less about tailoring the roast to each type of coffee and its attributes and more about keeping it fast and light, but well-roasted/developed so you can evaluate for defects and qualities. There is an example profile for a Brazilian sample roast below, however.
- During the roasting, what are the recommended ROR levels in different phases? And the total roasting time?
- That totally depends 🙂
- For small batches would Rob advise us to focus on following a certain curve or rate of rise, or something simpler like time in the drying/Maillard/development stages?
- I would follow stages first and foremost… see answer in the question below for info on timings. I think curve shape is important too, so it is more of a “both” and not an “either/or”. That being said, a pretty curve or ROR that is connected with too fast or too slow of a roast (or too light or dark for that matter) will produce garbage coffee. So it it a matter of looking at it holistically.
- How do you determine what the best sample roast profile for a new coffee is going to be? Do you use growth height? Or density? Or something else? Samples normally come in max 300 g packages so you only get two shots at getting it right.
- Generally with sample roasting, you’re right… you don’t have a lot of chances to play around. I will tend to try one sample roast and take it all the way through cupping before roasting the other part of the sample in case the first run-through ends unfavorably. Usually yellow at 4:30, first crack at 8:00 and out at 9:30 is fine for timings. Assuming weight loss is 11-13% and I’ve hit my timing marks I would feel I did the best possible with that coffee and could assume the cupping is representative of what the coffee holds.
That being said, I may not be hitting the “optimum” profile for it, but would be able to know enough whether the coffee was worth my time or not. If you don’t hit it, then you get another chance with that second batch. If you think it’s good enough and want to explore what is possible that’s when I would deviate from the sample profile and experiment with shorter this, and longer that… etc.
If it is bad at a “good roast approach”, then it isn’t worth your time likely. That being said, there are always exceptions. I have gotten samples before that weren’t great that I bought because of the relationship I’ve had with the producer and when the coffee landed in our warehouse it was AMAZING. So some of it can have to do with how fresh, well rested, etc the sample is.
- Generally with sample roasting, you’re right… you don’t have a lot of chances to play around. I will tend to try one sample roast and take it all the way through cupping before roasting the other part of the sample in case the first run-through ends unfavorably. Usually yellow at 4:30, first crack at 8:00 and out at 9:30 is fine for timings. Assuming weight loss is 11-13% and I’ve hit my timing marks I would feel I did the best possible with that coffee and could assume the cupping is representative of what the coffee holds.
- How do you prevent light roasts from tasting too grassy/woody? Where in the roast process do you add more heat/time?
- Generally grassy / woody light roasts come from 2-3 different things. If you don’t notice these aromas in the ground coffee, but notice it in the brewing, then I would encourage you to start by evaluating your brewing practices as it is possible you are getting these flavors from poor extraction. Buy or borrow a refractometer and become familiar with how to use it and it will tell you a lot about your brewing successes and failures. If it’s not that, and you’re getting the grassy/veggie/woody in the ground fragrance too then I would look at adding development time, or roast degree (increase end temperature). Generally for washed coffees I hesitate to use less than 1:30 development time. Not that I never do it, but it is risky. At 2:00 or 2:30 the woody/grassy/veggie should be gone assuming that you’ve hit a sufficient degree of roast.
Usually if weight loss is less than 11% I would worry that it is under roasted / under developed. So I would (assuming my dev time is 1:30 – 2:00) increase my end temperature to increase my weight loss %.
Finally, it is possible it’s just the green. Some green coffees due to age, or growing/processing issues just have these off flavors. In that case (if sample roasting) don’t buy them. If you have bought them, then it is a good time to explore medium and dark roasting until you’re through with the bag.
- Generally grassy / woody light roasts come from 2-3 different things. If you don’t notice these aromas in the ground coffee, but notice it in the brewing, then I would encourage you to start by evaluating your brewing practices as it is possible you are getting these flavors from poor extraction. Buy or borrow a refractometer and become familiar with how to use it and it will tell you a lot about your brewing successes and failures. If it’s not that, and you’re getting the grassy/veggie/woody in the ground fragrance too then I would look at adding development time, or roast degree (increase end temperature). Generally for washed coffees I hesitate to use less than 1:30 development time. Not that I never do it, but it is risky. At 2:00 or 2:30 the woody/grassy/veggie should be gone assuming that you’ve hit a sufficient degree of roast.
- Sometimes during sample roasting there is no audible first crack even though the beans are clearly roasted beyond first crack. Any idea how this can happen?
- Some beans just crack quietly. I suspect it can come from one of two different places:
1. If the beans are not able to contain the pressure appropriately during roasting then the pressure does not build to the same extent causing the cracking sound.
2. The pressure build is fine, but something about their malleability due to glass transition allows them to expand and release the pressure without being audible. I tend to find that decaffeinated coffee, naturals, experimental processing, and some lower altitude coffees tend to be this way. (Also, slow roasting styles can exacerbate this issue too.)
This is one of the reasons why I seek to identify first crack by not only listening, but also smelling. Just before first crack sugar caramelization is taking place, and during that time Sucrose is being degraded and one of the byproducts is acetic acid. As the coffee begins to open up, off-gas volatile acetic acid comes out in the aromatics in the trier. Usually when I get 2 vinegary pulls on the trier I mark FC even if I cannot hear anything.
- Some beans just crack quietly. I suspect it can come from one of two different places:
Settings Questions:
- How do you scale up from small (mini) batch to large. So from 100 – 150 g to 800 – 1000 g?
- Well, the first thing I would say is that when scaling it is important to decouple yourself from thermocouple readings to an extent. While I understand that the IBTS is helping us mark FC and even talk end temperatures with greater consistency than we do with traditional thermocouples I still like to verify by paying close attention to the physical changes in the coffee and then verify through objective measurements taken post roast. See here for a framework in my write-up with Roast Magazine.
I like to start at the end and work my way back to the beginning. First, you need to match roast color and weight loss %. Generally, I have notes from similar coffees that give me an idea of color / end temperature relationships across various roast batch sizes. So this gives me an idea of my target end temperature. Because of the advantages of IBTS this may be a one-for-one translation for end temperature, but I haven’t tested this and cannot attest to this being the case.
Then, I want to keep my timings the same to take the beans through the same experience of being roasted. This means my over-all roast time, and my segment times will all match up. The most important time segment is development time, so I want to be sure that the development time is the same +/- 10 seconds. Then I want to get the timing of first crack the same +/- 10 seconds. Finally I will aim to hit yellowing at the same time +/- 10 seconds. Importance goes from the right to the left when it comes to roasting. End color is #1, then development time, then when first crack hit, and everything else cascades. If you find yourself having to sacrifice something to make the batch size transition then sacrifice from the left side of the roast :-).
- Well, the first thing I would say is that when scaling it is important to decouple yourself from thermocouple readings to an extent. While I understand that the IBTS is helping us mark FC and even talk end temperatures with greater consistency than we do with traditional thermocouples I still like to verify by paying close attention to the physical changes in the coffee and then verify through objective measurements taken post roast. See here for a framework in my write-up with Roast Magazine.
- Lowest possible batch size ?
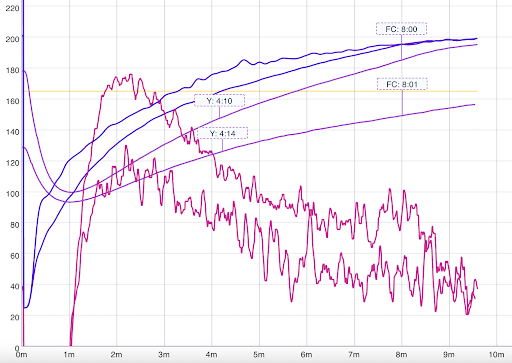
- You could probably roast 20 grams in there, but you wouldn’t have any usable data right? So if we’re talking about how small can you controllably roast I would say that the lowest I have successfully roasted over and over again is 150g. Can you consistently roast smaller, yes 100%. I don’t have data for that. Now, if we’re asking how small can we roast and still have meaningful data from IBTS? Part of that question for me is meaningful data when? Cause if you look at this picture below you’ll see that the 150g batch and the 662.5 gram batch that they do not match in temperature readings… until FC. Then they follow pretty closely on IBTS.
- I understand how increasing or decreasing development time can impact the flavor of coffee, as well as the breakdown of some CGA’s into more favorable acids as per Rob’s book. Development time aside, should you roast with a general end temperature in mind so that any shortening or lengthening of development time corresponds to a similar steepening or flattening of the ROR curve to meet said target ?
- Yes 100%. So if I am roasting to a light roast, but need more development time, then I will hold my end temperature stable and will adjust my RoR so that I hit that temperature within the desired timeframe. I often have an end temperature in my head because if I roast a short development time to a higher degree of roast then I feel like I just get acidic chocolate which is not my favorite flavor in coffee.
- I have read on Roaster Joe Morrocco’s blog that your end temperature should float somewhere plus or minus 6 degrees Celsius to your charge temperature. Getting some clarification on Rob’s thoughts on ending temperatures could be very helpful for me in achieving proper development curve and avoiding any defects such as baking.
- I think this is helpful advice on certain roasters, and for very specific styles of roasting but I do not hold it true across roasting machines. For example on my Loring, to the same 210 C end temperature (light) for a full batch I need to charge to 230 C minimum (on the s35 and s70 I would have to charge to 259 C) for that same light roast. On a small batch I need to charge at 135 C for the same coffee. Charge temperatures are 100% dependent on roasting machine setup, roast style, coffee metrics, etc… so while something formulaic like that may be helpful for starters or on certain equipment I feel like it is limiting outside of that realm. Please note I say this with all love and respect to Joe Morrocco who I deeply respect as a roaster, coffee educator, and friend.
- How do you react to changes in IBTS ROR so that there are no big spikes/drops?
- As batch size decreases, there will be more noise and that is okay. You just have to enter it with the radical acceptance that noise happens and it isn’t the coffee, just the measurement of the coffee.
- Do you use the same preheat temp and starting P/F/D settings for each bean? If not, how do you determine ahead of time your initial settings?
- For sample roasting yes. As we have talked about, we’re more aiming to do the same thing batch to batch. That being said, if I had a coffee that was wet (11-12% … please note anything over 12% should be an immediate rejection) I would likely roast with a little more heat at the beginning or middle because of the impact of the water.
- How are we gonna end this QA?
The “Proof in the Pudding”
Rob’s latest coffee project is Iteration.Coffee, whose stated purpose is to explore outstanding coffee flavors with an emphasis on transparency and community-building, in order to bring people around the world together in celebration of our favorite beverage.
His box-set for May 2022 features this Brazilian coffee that he first sample roasted on the Bullet. In fact, the profile that convinced him to purchase it is archived in Roast.World, as shown below!
If you’re interested in trying this roast for yourself, while supplies last you can purchase it from the webshop here. Each box-set includes:
-
5 x 4oz (113.4g) packages
-
1 gift of green coffee (0.25lb) so you can try roasting it at home
-
Links to the documentation, data, and rationale behind the coffees
And after this one sells out… well, there is always new coffee to explore on the horizon.
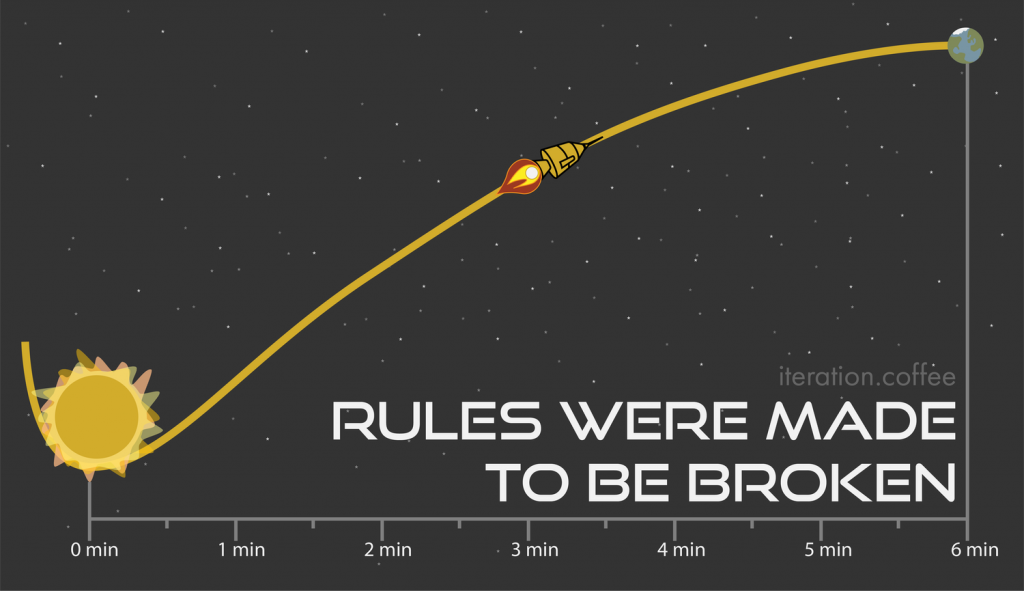
Final Note:
Consider the information here merely as a starting point to blast off into very small batch roasting, and don’t be afraid to experiment with these principles in your own way.
After all, Rob is the first guy who’ll tell you that…